
The post title unintentionally sounds like a movie franchise (e.g. Star Trek II: The Wrath of Khan), but in my defense I DID promise I will return to the topic of pushing events to the browser using Socket.io and Node.js in the post about message queues. The idea was to take the example I wrote about in Pushy Node.js and modify it so that the server messages are received from another service using a message queue.
I got the idea for the sequel title from an awesome tweet I saw the other day:
Alas, nothing can be hidden under the Google administration – a quick search yields an article from 2010 on mullet architecture (an actual one, with houses, not software). There is even such a thing as ‘reverse mullet’ – party in the front and business in the back. Frank Lloyd Wright aside, I did mean ‘software architecture’ in this particular post. I wanted to mimic the situation we face these days, where Node.js front end typically communicates with the legacy services in the back that nobody dares to touch. As a result, this post will mix Node.js, Socket.io, MQTT protocol and Java app (posing as the mullet’s backside). I am all for accuracy in advertising.
To refresh your memory, the example app in the previous article was creating a hypothetical system in which builds are running on the server, and as they are going through their execution, we use Web Sockets to drive the Bootstrap progress bar in the browser. To make the original sample palatable, we faked the build by simply using the timeouts. We will continue with the fakery, but remove one layer by moving the fake build into a dedicated Java app. This Java app (if you squint, you can imagine it is in fact a Jenkins server running builds) will react to the POST request to start or stop the build, but the build service will publish messages using the message broker. Our Node.js app will subscribe to the ‘builds’ topic and pass the information about the build progress to the client using Socket.io.
This all provides the ‘how’, but not the ‘why’. Recall that the power of message queues is in avoiding polling (our Node.js app does not need to constantly nag the Java app “are we there yet?”), and also in providing for flexible architecture. Imagine, for example, that in the future we want to capture trend data on build average times and success/failure rates. We could easily write another service that will subscribe to the ‘builds’ topic and store the data in a DB, and also provide a nice data visualization. I can easily see a nice Node.js app storing data into a NoSQL database like as MongoDB or CouchDB, and a nice page rendered using Dust.js template and D3.js for data visualization. Why, the app is practically writing itself!
The key point here is that you can easily add this feature tomorrow by simply adding another subscriber to the ‘builds’ message topic – you don’t need to modify any of the existing apps. This low friction way of growing the system by adding micro-services is very powerful, and has also been reinforced during the recent NodeDay in the presentation by Richard Roger, founder of NearForm.
All right then, we know why and we know how, so let’s get busy. First, we will install RabbitMQ as our message broker. I have chosen RabbitMQ because it is open source, supports multiple protocols, scales well and is available as a service in PaaSes such as CloudFoundry or Heroku. As for the protocol, I will use MQTT, a lightweight pub/sub protocol particularly popular for anything M2M. If you want to play with MQTT but don’t want to install RabbitMQ, a lightweight open source MQTT broker called Mosquitto is also available, although I don’t know how well it can hold up in production.
For our Java app, both AMQP and MQTT clients are readily available. RabbitMQ provides the AMQP client, while Eclipse project Paho has the MQTT client. For this example, I will use the latter. When you have time, read the article REST is for sleeping, MQTT is for mobile by J Spee.
Let’s look at the diagram of what the control flow in the original example app looked like:
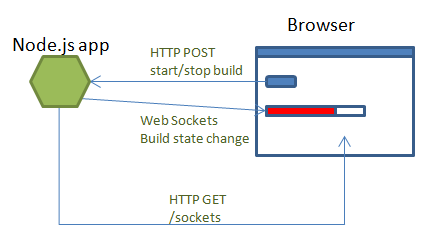
A Node.js app handles the initial GET request from the browser by rendering the page with a button and a progress bar. Button click issues a jQuery Ajax POST request to the app, initiating a fake build. As the build is going through the paces, it uses Socket.io and Web Sockets to push the progress to the brower, moving the progress bar.
Now let’s take a look of what the new topology will look like:

The flow starts as in the original example, but the Node.js app just proxies the build start/stop command to the Java app listening on a different port. The Java app will kick a fake build on a worker thread. As the build is running, it will periodically publish messages of its progress to the message broker on a predetermined topic using MQTT client. Node.js app registered as a subscriber to the same topic will receive the messages and pass them on the browser using Web Sockets.
In order to save space, I will not post the code snippets that didn’t change – check them out in the original article. The first change here is how we react to POST request from the browser in the Node.js app. Instead of kicking off or stopping the fake build, we will just proxy the call to the Java app:
exports.post = function(req, res) {
	var options = {
       hostname: 'localhost',
       port: 9080,
       path: '/builds/build',
       method: 'POST'
	};
	var rreq = http.request(options, function (rres) {
		console.log('Redirect status: '+rres.statusCode);
	});
	rreq.write(JSON.stringify(req.body));
	rreq.end();
}
On the Java end, we will write a JEE servlet to handle the POST request:
package fake.java.build.service;

import javax.servlet.ServletInputStream;
import javax.servlet.http.HttpServlet;
import javax.servlet.http.HttpServletRequest;
import javax.servlet.http.HttpServletResponse;

import org.apache.wink.json4j.JSON;
import org.apache.wink.json4j.JSONException;
import org.apache.wink.json4j.JSONObject;
import org.eclipse.paho.client.mqttv3.MqttClient;
import org.eclipse.paho.client.mqttv3.MqttException;
import org.eclipse.paho.client.mqttv3.MqttMessage;
import org.eclipse.paho.client.mqttv3.MqttPersistenceException;

public class BuildService extends HttpServlet {
	private static final String TOPIC = "builds";
	private static FakeBuild build;

	class FakeBuild implements Runnable {
		boolean running;
		boolean errors;

		public void run() {
			MqttClient client;
			try {
				client = new MqttClient("tcp://localhost:1883", "pushynodeII");
				client.connect();
			} catch (MqttException e) {
				e.printStackTrace();
				return;
			}
			running = true;
			errors = false;

			for (int i = 0; i <= 100; i += 10) {
				if (i == 70)
					errors = true;
				if (i == 100)
					running = false;
				// notify state
				publishState(client, running, i, errors);
				if (running == false)
					break;
				try {
					Thread.sleep(1000);
				} catch (InterruptedException e) {
					e.printStackTrace();
				}
			}
			try {
				client.disconnect();
			} catch (MqttException e) {
				e.printStackTrace();
			}
		}

		private void publishState(MqttClient client, boolean running,
				int progress, boolean errors) {
			try {
				JSONObject body = new JSONObject();
				body.put("running", running);
				body.put("progress";, progress);
				body.put("errors", errors);
				MqttMessage message = new MqttMessage(body.toString()
						.getBytes());
				try {
					client.publish(TOPIC, message);
				} catch (MqttPersistenceException e) {
					e.printStackTrace();
				} catch (MqttException e) {
					e.printStackTrace();
				}

			} catch (JSONException e) {
				e.printStackTrace();
			}
		}
	}

	protected void doPost(HttpServletRequest req, HttpServletResponse res) {
		try {
			ServletInputStream bodyStream = req.getInputStream();

			JSONObject body = (JSONObject) JSON.parse(bodyStream);
			bodyStream.close();
			doToggleBuild("start";.equals(body.get("action")));
		} catch (Exception e) {
			e.printStackTrace();
			res.setStatus(500);
		}
	}

	private void doToggleBuild(boolean start) {
		if (start) {
			build = new FakeBuild();
			Thread worker = new Thread(build);
			worker.start();
		} else {
			if (build!=null)
				build.running = false;
		}
	}
}
In the code above, a ‘start’ command will kick the build on the worker thread, which will sleep for 1 second (as in the JavaScript case), and then send a MQTT message to update the subscribers on its status. In case of a ‘stop’ command, we will just turn the ‘running’ flag to false and let the build to naturally stop and exit, and also update the status. We will pass the build state in message body as JSON (duh).
Once the Java app is up and running and messages are flowing, it is time to add a MQTT message subscriber in Node.js app. To that end, I installed the mqtt module using NPM. All we need to do to start listening is create a client in app.js, subscribe to the topic and register a callback function to handle incoming messages:
var mqtt = require('mqtt')
   ,io = require('socket.io');

....

    var server = http.createServer(app);
    io = io.listen(server);

    var mqttClient = mqtt.createClient(1883, 'localhost');
    mqttClient.subscribe('builds');

    mqttClient.on('message', function (topic, message) {
       io.sockets.emit('build', JSON.parse(message));
    });
The code above will create a client for localhost and the default tcp port 1883. In a real world situation, you will most likely supply these as environment or config variables. The client listens on the topic and simply passes on the body of the message as a JavaScript object by passing the message to all the currently opened sockets (clients). One important meta-comment highlighting difference in approaches between Node and Java: because Node is asynhconous, I was able to create a client and bind it to a TCP port, then proceed to bind the app to another port for HTTP requests. In a JEE app, we would need to handle incoming messages in a separate thread, and possibly manage a thread pool if one thread cannot handle all incoming message traffic. As if you needed more reasons to switch to Node.js.
In terms of behavior, this code in action looks the same in the browser as the previous example, but we made an important step towards an architecture that will work well in todays’ mixed language architectures and have room for future growth. What I particularly like about it is that Java and Node.js apps can pass the messages in an implementation-agnostic way, using JSON. Note that the Java app in this example is not as far-fetched as it may seem: you can make the example even more real by using a Jenkins service. Jenkins has REST API that our Node app can call to start and stop build jobs, and once a job is underway, we can install an MQTT notifier plug-in to let us know about the status. The plug-in is simple and uses the same Paho client I used here, so if you don’t like what it does, it is trivial to roll your own.
The intent of this post was to demonstrate an architecture you will most likely work with these days, even if you are a total Node-head. Apart from legacy back-end services, even some newly written ones may need to be in some other language (Java, C++, Go). Nobody in his right mind would write a video transcoding app in JavaScript (if that is even possible). Using message brokers will help you arrive at an architecture that looks like you actually meant it that way, rather than fell backwards into it (what I call ‘accidental architecture’). Even if it is a mullet, wear it like you mean(t) it!
© Dejan Glozic, 2014
